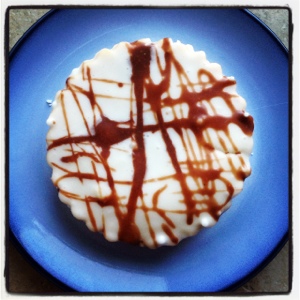
Coconut Mini Pies
Pie Filling
2 cups coconut milk
6 eggs
1/4 cup butter, melted and cooled
4 tsp vanilla extract
1 1/2 cups sugar
1/4 cup all purpose flour
1/2 tsp salt
2 1/2 cups shredded coconut, sweetened
Pie crust, unbaked (the equivalent of about 6, 9 inch crusts
Special equipment: 4-inch tart tins
Glazes
2 lbs confectioners sugar
1 cup (approximately) 2% milk
2-3 tbs cocoa powder
Preheat oven to 350. Combine the coconut milk, eggs, butter, and vanilla extract. Mix well. Add the sugar, flour, and salt and mix until just combined. Fold in the shredded coconut. Using the tart tin as a guide, cut out a circle of pie dough about 3/4 inch wider around than the tin. Then, using the tin again, cut out the dough using the top of the tin (same concept as using a biscuit cutter). Line the tin with the larger cut of dough, pressing the dough firmly into the corners and the edges of the tin. Fill 3/4 full with the pie filling. Top with the rest of the dough. Press around the edges to create a seal. Repeat with the remaining tins. Place the tins on a cookie sheet and bake for 30 to 35 minutes until the crust is lightly browned. Remove from the oven and cool for 10 minutes, then remove the pies from the tins and place on a rack to cool completely. NOTE: Most mini tart tins come in six packs. This recipe was made for a party so it makes 12. Don’t go out any buy a second. Just bake the first round, and once you remove the pies from the tins and they are cool, make the second batch. Or, just half the ingredients and only make six mini pies.
Once the pies are cooled completely, it is time to glaze them. Put 1/2 pound of confectioners sugar in one bowl, then 1/2 pound in a second bowl. Add 1 tbs of cocoa powder to one of the bowls. Start adding the milk to each bowl. Start with 1/4 cup in each bowl, then whisk until the sugar, milk, and cocoa (if applicable) are well combined. Add more milk if necessary. You want the glaze to be viscous but pourable, similar to the viscosity of honey. Also, taste the glaze with the cocoa powder and add more if you want a more chocolatey taste. First you glaze the bottoms of the tarts. Press the bottoms in the glaze so the glaze comes about half way up the sides. Let any excess glaze drip off then place the tarts, upside down, back onto the cooling rack. Let the glaze harden for at least an hour. Once the glaze hardens, make a second round of glaze repeating the above instructions. Similar to the first round of glazing, press the tarts top down into the glaze so the glaze comes up about halfway up the sides. Let any excess glaze drip off then place the tarts right side up on the cooling racks.
Use your creativity and palate when glazing the tarts. You can make some all chocolate, some just sugar/milk, or even half and half. After the top glazes harden slightly, you can drizzle some leftover glaze onto them for a decorative look.

